
Palworld is a monster-taming survival game that has already sold over 15 million copies worldwide. To catch Pals with friends or strangers online, you can create a server for other players to join. But how can you have it stay up even when you’re not in-game? The answer is to host a dedicated Palworld server.
In this guide, I’ll give you step-by-step instructions to install a dedicated Palworld server on Ubuntu.
Requirements for Palworld Server
Here are system recommendations to follow this guide:
- Operating System: Ubuntu Server 24.04 or another Linux distro.
- Processor: 4 CPU cores or more recommended.
- Memory: 16 GB RAM or more recommended.
- Storage: 50 GB or more recommended (with a fast SSD, like our NVMe block storage).
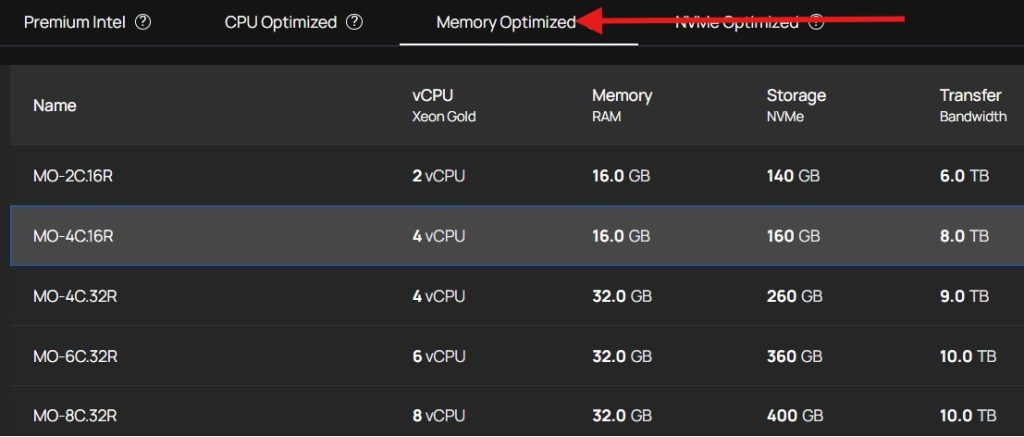
The hardware specs will vary depending on how many concurrent players you want to support:
- Up to 8 players: 4 CPU cores + 16 GB RAM
- Up to 16 players: 6 CPU cores + 32 GB RAM
- Up to 24 players: 8 CPU cores + 64 GB RAM
As RAM often becomes the limiting factor for Palworld, I recommend creating a memory-optimized instance if your host supports it.
Want a server that you can resize as your player base grows? Try a 1-click install of Palworld server for free from the LifeinCloud marketplace.
How to Set Up a Dedicated Palworld Server
In this section, you’ll install SteamCMD, download the Palworld server files, and then launch the server.
1. Install SteamCMD
The Palworld server runs via SteamCMD, a command-line program used to manage Steam game servers.
To get SteamCMD, we’ll have to enable the Ubuntu Multiverse Repository, which gives us access to copyright-protected packages.
Enable the Ubuntu Multiverse Repository, and add support for x86 packages:sudo add-apt-repository multiverse
sudo dpkg --add-architecture i386
Refresh available packages, and install SteamCMD: sudo apt update
sudo apt install steamcmd
Accept the license agreement:
A license agreement will appear. Hit Tab and Enter to continue. Select “I AGREE” and hit Enter to accept.

You’ve completed the SteamCMD installation.
2. Open Port 8211
Before proceeding, we need to take a quick detour. If your system uses a firewall, you’ll need to open ports for players to be able to connect.
(If you don’t have a firewall active, skip to the next section.)
For Palworld, you’ll need to allow UDP traffic to its default port 8211.
For example, if you’re using UFW: sudo ufw allow 8211/udp
Or for instance, if you’re using the LifeinCloud firewall interface on our platform:
Lastly, if your server sits behind a router (such as at home), you’ll also need to port forward UDP traffic on port 8211 to your machine.
3. Download the Palworld Server
Now that you’ve got SteamCMD, you’re ready to download the Palworld server files.
For security reasons, we don’t want to run SteamCMD as root, so let’s create a limited user account.
Create a ‘steam’ user:sudo useradd steam
You’ll be prompted to create a password. After that, you can press Enter to accept defaults for the other questions.
When you’re done, the /home/steam user directory should be created.
Switch to the new user:su - steam
Connect to Steam, and request the Palworld server files by AppID:
steamcmd +login anonymous +app_update 2394010 validate +quit
If this worked properly, the files should be downloaded to a hidden folder in the user’s home directory.
You can poke around by going to the /home/steam/.steam/steam folder.

4. Launch the Palworld Server
OK, we’re ready to launch the server!
Go to the folder with the server files:
cd ~/.steam/steam/steamapps/common/PalServer

Start the server:
./PalServer.sh
This script starts a Palworld server with basic settings.

For now, you’re ready to test if players can join.
To stop the server, press CTRL + C.
Once you’ve verified that your server is working and players can join, you’ll probably want to add arguments to improve the launch command.
Here’s an example of a launch command that optimizes performance:./PalServer.sh -useperfthreads -NoAsyncLoadingThread -UseMultithreadForDS -NumberOfWorkerThreadsServer=4
(Replace ‘4’ with the number of CPU cores you want to use.)
That completes the server installation. In the next section, I’ll go over how players can join your game.
How Players Can Join Your Dedicated Palworld Server
Now that you’ve got your Palworld server up and running, let’s test if players can connect.
1. Open the Palworld game client on your PC. Select Join Multiplayer Game.
2. At the bottom, there’s a box to enter a server address. Replace 127.0.0.1 with your server’s IP.
3. Click Connect.

For example, I put 154.46.31.120:8211 into the box for my server.
(If you don’t know your server’s public IP, find it from your cloud admin console. Or try the ip address command.)
If everything worked, the game should load in!

That completes our guide for today. Happy hunting!
(By the way, if you’re interested in hosting other games, don’t forget to check our guide to hosting a Minecraft server.)
FAQ for Palworld Server
How do I change the default port, restrict the player limit, or make my Palworld server public?
These options can be changed by adding arguments to the Palworld server launch script.
How do I set a join password or change my Palworld server’s default name?
Other settings are found in the PalWorldSettings.ini file. Here’s a full list of configuration file parameters you can modify.
I don’t want to leave my server console on to run Palworld. How do I fork the server to the background?
One easy way to run the Palworld server in the background is to detach a screen.
Give your screen a name and switch to it:screen -S mypalworld
Start the server as usual by running your launch script as above.
Detach from the screen: press CTRL+A+D.
This sends you back to your main session. Now even if you disconnect from your console, the Palworld server will still be running on the other screen.
When you want to maintain your server, you can resume the screen to check on things:screen -r mypalworld